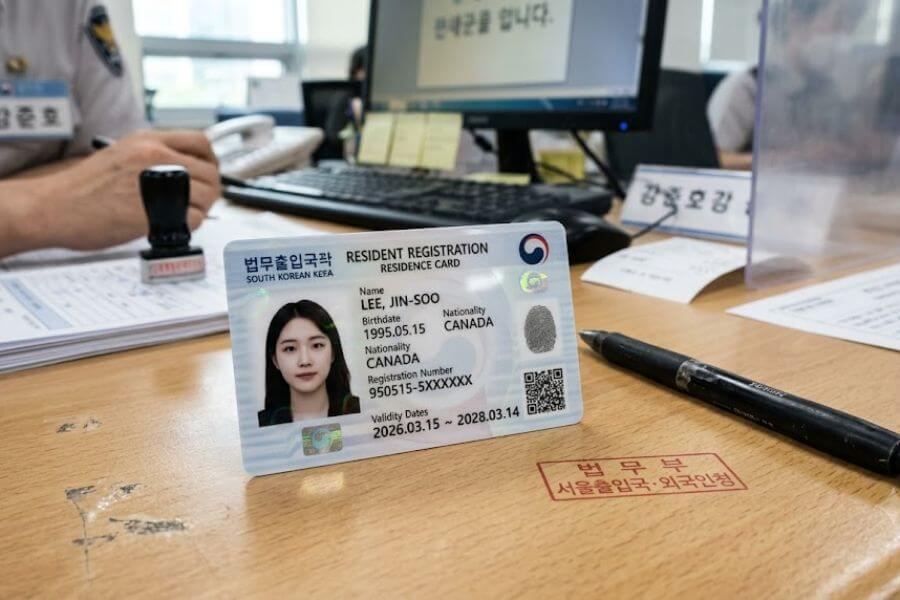
Moving to South Korea is an incredible adventure filled with amazing food, beautiful sights, and a vibrant culture, but if you plan to stay for more than ninety days, you have a crucial task to complete before you can fully settle into your new life. You must secure your official local identification card, which is historically and widely referred to as the Alien Registration Card, though recent official terminology updates often call it the Residence Card. This small piece of plastic is your ultimate key to unlocking a functional life in the country, as it connects you to banking, local phone plans, high-speed internet setup, and national health insurance. Missing out on this card means you remain a temporary tourist on paper, which severely limits your ability to do simple daily tasks. Navigating the legal bureaucracy of a foreign government can feel overwhelming, but breaking the registration process down into manageable parts ensures you get your card without unnecessary delays or stressful mistakes.
Understanding the True Importance of Your Local Identification Card
When you first land in South Korea, your passport and your initial entry visa are enough to keep you legally inside the borders, but that status quickly changes if your stay extends beyond a standard three-month period. Any foreigner planning to live, study, work, or undergo training in the country for more than ninety days is legally obligated to register with the immigration authorities. This rule applies across a wide variety of visa holders, including international students on student visas, language instructors on teaching visas, corporate professionals, working holiday participants, and those joining family members through marriage or long-term dependency. The card you receive serves as your domestic identification card, featuring a unique registration number that functions similarly to a social security number, establishing your legal presence within the public and private tracking networks of the country.
Living without this card past your initial ninety days is not just inconvenient, it is a serious legal violation that can lead to heavy financial penalties, complications with your visa status, or even forced departure from the country. From a practical standpoint, the card is required for almost every modern convenience you take for granted back home. For example, you cannot buy a contract smartphone plan under your own name without it, leaving you stuck with expensive, temporary tourist SIM cards that do not allow you to verify your identity online. In South Korea, online identity verification is tied directly to your legal name, phone number, and registration number, meaning that without your card, you cannot use popular food delivery apps, ride-sharing platforms, or local online shopping sites. Furthermore, opening a fully functional bank account that allows for international transfers, online banking, and debit card usage requires this official identification, making it the very first major milestone you must achieve upon arrival.
Navigating the 2026 Modern Upgrades and Policy Changes
The year 2026 brings some fantastic upgrades to how identification works for foreign residents in South Korea, making the entire ecosystem much more tech-friendly and inclusive. The most visible shift is the formal move away from the older terminology that used the word alien, which many felt was isolating, transitioning completely into a modernized design called the Residence Card. If you are applying for the first time now, you will receive a newly styled physical card that boasts advanced security features, including an embedded quick-response code on the front, upgraded holographic patterns that shift colors when you tilt the card, and a full-color photograph instead of the old black-and-white portraits. This design update makes the card instantly recognizable to local business owners, bank tellers, and government officials, minimizing confusion when you show your ID.
The absolute biggest game-changer for this year is the widespread implementation of the Mobile Identification system, which allows foreign residents to carry a legally valid digital version of their card directly on their smartphones. This digital card is accessed through a secure government-approved mobile identification app, and it carries the exact same legal weight as the physical plastic card in your wallet. If you are fourteen years old or older and possess a smartphone registered under your exact legal name, you can activate this mobile version either by visiting an immigration office or by simply tapping your new chip-embedded physical card against the back of your phone using near-field communication technology. This means you can leave your physical wallet at home and securely verify your age at a convenience store, check in at a hospital, or complete transactions at public institutions using just your phone, bringing unparalleled convenience to your everyday routine.
Gathering Your Universal Core Documents Checklist
Before you even think about walking into an immigration office, you must compile a flawless folder of paperwork, because missing even a single required document will result in your application being rejected on the spot, forcing you to start the scheduling process all over again. There is a universal set of core documents that every single applicant must provide, regardless of their specific visa type or reason for staying in the country. Gathering these items ahead of time keeps you organized and prevents last-minute panic.
The Universal Paperwork Collection
- The Official Application Form: Known officially as Form 34, this document can be picked up for free in the lobby of any immigration office, or you can print it out at home from the official government portal before your appointment. You must fill out your personal information completely using clear block letters, matching the spelling of your name exactly as it appears in your passport.
- Your Original Physical Passport: Your passport must be valid and in good physical condition. The immigration officer will need to physically inspect it to verify your identity and your entry stamps.
- A High-Quality Passport Photocopy: You must bring a crisp, clear photocopy of your passport identity page, which is the main page containing your photo, full name, and biological details. It is smart to also copy your specific Korean visa page just in case.
- One Standard Passport-Sized Color Photograph: The photo must measure exactly 3.5 centimeters by 4.5 centimeters and must have been taken within the last six months against a completely plain white background. Your face must be fully visible, looking straight ahead, with your ears showing and your hair kept away from your eyebrows. Wearing white clothing is highly discouraged because it blends into the white background, which can cause your photo to be rejected.
- Proof of Residential Address in South Korea: The government must know exactly where you are sleeping at night, so you must provide a legal document showing your address, which varies depending on your living situation.
| Housing Type | Required Proof of Residence Documents |
| Renting an Apartment | A complete photocopy of your official housing lease agreement signed by both you and the landlord. |
| Living in a University Dorm | An official certificate of dormitory residence issued directly by your school housing office, often accompanied by a payment receipt. |
| Staying with a Friend or Employer | A completed confirmation of accommodation form signed by the property holder, a photocopy of their national ID card, and a copy of the original lease. |
| Guesthouse or Short-Term Stay | A formal confirmation of residence form, a copy of the business license for the establishment, and a receipt for your most recent monthly payment. |
Compiling Visa-Specific Requirements and Medical Certificates
While the core checklist covers the basics for everyone, your specific visa category dictates additional paperwork that proves why you are allowed to remain in South Korea for the long term. If you are entering the country as an international undergraduate or graduate student on a D-2 visa, or as a language trainee on a D-4 visa, you must bring your official certificate of enrollment or your certificate of admission issued by your university registrar to prove you are actively studying. If you are moving to the country to teach English or another foreign language on an E-2 visa, your checklist includes a photocopy of your signed employment contract and an additional corporate registration license provided by your school administration.
An incredibly critical piece of the puzzle for many applicants is the mandatory tuberculosis clearance medical certificate. The South Korean government requires citizens from dozens of designated countries to undergo a professional medical screening for tuberculosis before they can register as residents. If your home country is on this high-risk list, you must visit a local public health center or a government-designated hospital after you arrive in South Korea to get a chest X-ray or a skin test. The medical facility will issue your results in a secure, sealed envelope. It is absolutely vital that you do not open this envelope under any circumstances, as breaking the official seal renders the medical certificate completely invalid for immigration purposes. E-2 visa holders face even stricter medical requirements, as they must complete a comprehensive health checkup at an authorized hospital that includes blood tests and screening for prohibited substances alongside their tuberculosis checks.
Master Step-by-Step Guide to the Application Process
Securing your card requires following a strict chronological sequence of actions, and knowing exactly what to do at each phase eliminates the mystery and keeps you moving forward smoothly.
1. Create Your Account on the Official Portal: Complete immediately upon arrival.
As soon as you unpack your bags, open a web browser and navigate to the official e-government portal for foreigners, which is called HiKorea. Switch the website language setting to English in the top-right corner of the homepage and register for a personal account using your valid passport number, your date of birth, and your official arrival details. This portal is the central hub where you will manage your legal stay, handle scheduling, and request future visa extensions.
2. Reserve Your In-Person Appointment Slot: Book early to beat the seasonal rush.
Log into your new portal account and navigate to the visit reservation section to book an absolute date and time for your mandatory in-person application. You must select the specific immigration branch office that holds legal jurisdiction over your exact residential address, because if you accidentally book an appointment at a branch in a different part of the city, the officers will refuse to serve you. Slots fill up weeks in advance, especially during the peak student arrival months of February, March, August, and September, making it essential to secure your spot the moment you enter the country.
3. Visit the Health Center for Medical Screening: Allow several days for official processing.
If your visa status or nationality requires a tuberculosis clearance or a full health checkup, locate your nearest public health center or a designated hospital. Complete your medical screening early in the week, pay the small administrative testing fee, and return a few days later to collect your official paperwork. Remember to leave the envelope completely sealed and place it directly into your application folder alongside your passport and lease.
4. Attend Your Scheduled Immigration Office Appointment: Arrive fifteen minutes before your timeslot.
On the day of your appointment, travel to your designated jurisdiction office with your complete physical folder of documents. Locate the digital waiting board in the main lobby, look for your specific reservation number or your name, and wait quietly for your number to be called to an open service window. Hand over your application form, passport, photos, housing proof, and visa documents to the immigration officer for a detailed live review.
5. Complete On-Site Fee Payments and Fingerprinting: Bring physical cash for transaction kiosks.
The processing fee for your physical card is thirty-five thousand Korean Won, and you will typically pay this on-site using specialized electronic payment kiosks located right inside the immigration office lobby. Follow the on-screen instructions to pay the fee using cash or a local card, print out your official payment receipt, and hand it back to your officer. The officer will then guide you to an electronic scanning device where you must scan all ten of your fingerprints to register your biometric data into the national system, after which you will receive a temporary paper application receipt.
Strategic Delivery Options and Managing the Long Waiting Period
Once your fingerprints are scanned and your paperwork is officially approved, the hard part is over, but you must now wait patiently for the government printing office to manufacture your physical card. The standard waiting time for card issuance typically ranges anywhere from two to four weeks, though this timeline can easily stretch to five or six weeks if you submit your application during the chaotic peak periods at the start of a new school semester. While you are waiting, your original physical passport will be returned to you, and you will also hold onto your official paper application receipt, which acts as a legal temporary proof of your ongoing application status inside the country.
During your appointment at the service window, you must choose how you want to actually receive your finished card once it is ready. You have two primary paths to choose from based on your personal schedule and your budget constraints.
The In-Person Collection Path
The first option is to return to the immigration office in person to pick up your card, which is completely free of charge. Once the processing window closes and you receive an official text message confirming your card is printed, you can walk back into the same immigration branch. The great thing about picking it up yourself is that you do not need to make another online reservation on the portal, as most offices have a dedicated, fast-moving pickup window where you can simply show your passport and your paper application receipt to collect your new ID within minutes.
The Postal Courier Delivery Path
The second option is to request government postal courier delivery when you are initially submitting your documents at the window. This option requires you to pay an additional mailing fee of around three thousand to four thousand Korean Won in cash on-site. If you choose this route, the card will be securely mailed directly to your registered home address via a specialized mail carrier. The mail carrier will require a person to be physically present at your home to sign for the package, meaning that if you live alone and are constantly out at work or school during the day, the delivery might fail, forcing you to track down the package or go to the post office to claim it.
Critical Legal Obligations and Post-Issuance Responsibilities
Holding that fresh, high-tech physical card in your hand is an amazing feeling that brings a massive wave of relief, but owning this identification card comes with serious ongoing legal responsibilities that you must respect to avoid getting into deep trouble with local authorities. The card is a living legal document tied directly to your current real-world circumstances, which means that whenever your personal details change, you are required by law to report those adjustments to the immigration service within a very strict timeframe.
The most frequent scenario you will encounter is moving to a brand-new house or apartment. If you pack up your things and change your address anywhere within South Korea, you are legally required to report your new residence within fourteen days of your official move-in date. Failing to do so results in steep, escalating financial fines that can complicate your future visa renewals. Thankfully, you do not have to trek back to the crowded main immigration office for a simple address update, as you can easily report the change online through the portal, or you can walk into your local neighborhood district office, which is called a resident center or a Gu-office, located right in your new community. A helpful staff member at the district office will update the digital database and print your brand-new address onto the physical grid lines on the back of your plastic card on the spot.
Beyond moving houses, you must also report any major updates to your passport details within a fourteen-day window. If your passport expires while you are living in South Korea and you successfully renew it through your home country’s local embassy, you must submit a report containing your new passport number, its issue date, and its new expiration date via the online portal. Similarly, any changes to your legal name, your nationality, or your employment workplace for specific work visa holders must be officially declared. Keeping these records immaculate ensures that your digital profile matches your real-life situation perfectly, keeping your stay entirely legal and completely stress-free.
Summary Checklist for a Seamless Application Day
To ensure you walk out of the immigration office with a smile on your face and a temporary application receipt in your hand, review this final overview checklist on the morning of your scheduled appointment.
- Double-check that your passport photo meets the exact dimensions and features a pure white background with no white clothing.
- Confirm that your housing contract is fully signed, legible, and accompanied by an owner’s identification card if you are sub-renting or staying with friends.
- Keep your medical certificate envelope completely sealed, flat, and free of any tears or punctures.
- Bring plenty of physical Korean Won cash to the office, as the payment kiosks for revenue stamps and courier fees often do not accept international credit cards.
- Arrive at least fifteen minutes before your reservation time to find your window, look over the bulletin boards, and organize your files.
Frequently Asked Questions
Can I travel outside of South Korea while my application is still being processed?
No, it is highly recommended that you do not leave the country while your initial registration is actively processing. If you exit the country before your card is officially printed and registered in the national database, your long-term visa can be automatically canceled by the airport computer systems, which means you will have to restart your entire visa application process from scratch back in your home country.
What should I do if I accidentally lose my physical card?
If your card goes missing or is damaged beyond repair, you must apply for a formal reissuance within fourteen days of realizing it is gone. You will need to book a new appointment on the portal, fill out the application form checking the reissuance box, present your passport, submit a fresh passport photo, write a brief statement explaining how the card was lost, and pay the thirty-five thousand Korean Won processing fee again to get a replacement card.
Can my school or my employer apply for the card on my behalf?
Yes, certain universities and large corporate employers offer group registration services for incoming international students or new foreign employees during peak seasons. If your institution offers this service, they will collect your physical passport, photos, fees, and documents to submit them in bulk, which saves you a trip to the office but often takes a bit longer to process than a standard individual appointment.
Do I need to be fluent in the Korean language to complete my appointment successfully?
No, you do not need to speak fluent Korean to get through your appointment. The immigration officers who handle foreign registration are accustomed to working with people from all over the world and generally speak functional English or have translated signs and instructional worksheets at their desks to guide you through the fingerprinting and document submission steps.
Does my child need their own separate card if we are moving together?
Yes, every single foreign national staying in South Korea past the ninety-day limit must have their own individual registration profile and their own physical card, regardless of their age. Parents or legal guardians must fill out a separate application form for their children, present their independent passports, provide birth certificates to prove the family relationship, and accompany them to the office for registration.